EDITING PICTURE, AUDIO AND VIDEO


EDITING PICTURE, AUDIO AND VIDEO


Edit Picture Using GIMP 

Open Image
⇩
Select Scissors ✂
⇩
Enter
⇩
Edit  > Copy
⇩
File > New
⇩
Adjust Image Size, Select Landscape
⇩
OK
⇩
Add New Layer
⇩
Edit > Paste. Adjust image size using Scale Tool
⇩
Move image using Move Tool
⇩
File > Save As > Naming the File


  • Feather Edges 🠞 Obtain soft edges around the image
  • Rectangle Select Tool, Free Select Tool 🠞 Gives the same results as Scissors


🔹Insert Background

Open Named File 
⮟
Select Layer Background
⮟
Insert background using Bucket Fill, Gradient Effects or Pattern Fill


🔹Filter Technique 


Click on layer that want to add special effects
⮛
Right click on image, select Filter


Editing Audio Using Audacity

  • Create book in CD form or Teaching and Learning materials
  • Record voice, music from CD, DVD or Radio
  • Record Podcasts
  • Create Ringtone
  • Edit songs or voice

🔸Installation of Audacity and Lame MP3 Encoder Software

Audacity
❧ Open Google Chrome
❧ Type website address : http://audacity.sourceforge.net
❧ Click on Download Audacity 2.0.3
❧ Download
❧ OK
❧ Run
❧ Select language, click Next until Installation process ended


Lame MP3 Encoder

❖ Open Google Chrome

❖ Type website address : http://lame.buanzo.com.ar
❖ Click on link : Lame_v3.99.3_for_Windows.exe
❖ Run


⭕ To Record Recording

⚝ Connect microphone to the computer ⚝
 ⚝ Open Audacity Software ⚝
⚝ Adjust input level for the microphone ⚝
⚝ Click on Record button & start a conversation to record voice ⚝
⚝ Press Stop to stop recording ⚝
⚝ Press Play to hear recording voice ⚝


❐ To Delete Selected Part in the Recording

Click on Selection Tool → Choose part / audio segment to delete  → Press Delete

☘ To Improve Sound Quality in the Recording

Edit ⮞ Select > Click All ⮞ Click Effect ⮞ Select Bass and Boost ⮞ OK ⮞ Press Play (voice will increase that the initial voice)


- Eliminating vocal sound and only music remain : Karaoke
  • Effect ↝ Vocal Remover (for center-panned vocals)
  • To save file: Menu File 🠖 Export 🠖 Give name and choose suitable audio format
✜ However, only songs that have high quality that can eliminate vocal voices maximally 


🖫 Save

1) Save as Project
File
⇣
Choose destination to save file
⇣
Press Save button
⇣
Click Save Project


2) Save as MP3


File
↡
Export
↡
Choose destination to save file
↡
Press Save button
↡
Project will save in ext.mp3


📁 Import Audio File

File ↦ Import ↦ Audio
⇓
Choose destination to save file
⇓
Open

BLOG


BLOG

🌝 Definition of Blog 🌝

Blog ➤ short form of weblog, which is a personal notes or journal on internet network.
Blogging ➤ updating blog
Blogger ➤ a person who are updating the blog


🌝 The Importance of Blog 🌝
  • Can exchange  information 
  • One of the main source of reference to get to know recently news
  • Medium to introduce their selves or their product


✨ Creating blog using Google Blogger

-Through URL-

  1. http://www.blogger.com
  2. http://www.blogspot.com
✍ Step to creating blog:

Creating Blog using Google Account ⇝ Naming the Blog ⇝ Choose suitable Template for Blog


MICROSOFT POWERPOINT

MICROSOFT POWERPOINT


-Basic Technique in PowerPoint-


1. Open PowerPoint program

❣ Start PowerPoint program
❣ Select Slide Design
❣ Insert Text
  • Title
  • Subtitle
❣ Save file
❣ Build New Slide


2. Insert Graphic

⚜ Steps to Insert Graphics:

Click on Menu Insert ☛ Bring cursor to Picture, click From File ☛ Select picture from Folder or Internet ☛ Open


3. Insert Texts under Graphic:

Insert ➠ Text Box ➠ Drag cursor under the graphic to add text ➠ Type " Beautiful Island " ➠ ENTER


4. Make Animation for Texts and Graphic:

Animation ➢ Highlight Text ➢ Add Animation ➢ Select Animation Style


5. ✯ Insert Sound Element:

Insert ⤅ Sound ⤅ Choose either audio from file, clip art or record audio ⤅ Insert

    ✯ Edit Sound Element:

Click on Microphone symbol ↣ Audio tools ↣ Playback ↣ Start ↣ Automatically ↣ Tick box Loop until stopped ↣ Tick box Hide during show


6. Present the Slide ⇨ Slide show ⇨ From Beginning


7. Build Table and Chart

✿ Build Table:
Add new slide ⇢ Click to Add Title ⇢ Type ' Statistics of Tourist to Pulau Langkawi' ⇢ Double click on Table icon ⇢ Insert number of row and column ⇢ Insert Data ⇢ Adjust size and position of font


✿ Build Chart:
Add new slide ⇢ Click to Add Title ⇢ Type ' Statistics of Tourist to Pulau Langkawi' ⇢ Double click on Chart icon ⇢ Chart ⇢ Click on Line chart, select Line with Marker ⇢ OK ⇢ Fill in data in Datasheet (Excel) ⇢ Chart is builded


8. Build Navigation Button

Insert ⇰ Shapes ⇰ Find Action Buttons, select Action Button : Forward or Next ⇰ Click any section on the slide ⇰ On displayed of Action Settings, choose Hyperlink to : Next Slide ⇰ OK


9. Build Question
  • Insert Questions Text
  • Type Answer Choice Text
  • Insert Correct Answer Text - Activate Correct Answer Slide 
  • Build Hyperlink to return back to the Question Slide
- Click on Rectangle shape to cover overall of the screen slide

- Insert ⇝ Hyperlink ⇝ Place in this document ⇝ Click on Question 1 Slide ⇝ OK
  • Build Hyperlink for Correct Answer
- On slide Question 1:

Highlight correct answer ⇒ Hyperlink ⇒ Place in this document ⇒ Click on Correct Answer Slide ⇒ OK

#Repeat the same for Wrong Answer


10. Build Web Page

❄ Save PowerPoint Presentation

❄ Press ALT and F11 button simultaneously. There will be a display of Microsoft Visual Basic (VBA) 

❄ Press CTRL button and G letter simultaneously. This will be open an Inmmediate window under VBA screen.


❄ Type codding: ActivatePresentation.SaveAs"C:\MyPages\Island.htm",ppSaveAsHTML,msoFalse

❄ ENTER

❄ To view the web site, Open Directory C and Click folder named MyPages

❄ Click file Island.htm in that folder


MICROSOFT EXCEL

MICROSOFT EXCEL


Build Worksheet:

Students' Information Worksheet

(1) Naming the new sheet
- Click on format
- Scroll to Organize Sheets
- Click on Rename Sheet
- Type the title: Students' Information
- Press Enter

(2) Change Column Size

⭖ Using Menu Bar

Click Format ➤ Scroll to Column - Width ➤ Insert new size ➤ OK

⭖ Using Mouse Pointer

Put cursor on column A ⇢ until symbol "↔" displayed, drag the cursor to the left and right to change the column size

Attendance Worksheet

-1- Build Attendance Worksheet

-2- Build data link:

Click on B1 cell ⇨ type "=" sign ⇨ Click on Students' Information sheet ⇨ Click on 'Student Name' and press Enter ⇨ Back to Attendance Worksheet to see the 'Student Name' column ⇨ Click at the B1 cell box corner and drag to B31


-3- Fill in number using Autofill


Mark Worksheet

1. Build Mark Worksheet

2. Build data link

3. Use Validation:

Click on C2 cell ➣ On the Menu Bar, Click Data ➣ Click Data Validation ➣ On Allow, choose Whole Number ➣  On Data, choose less than or equal to and type 100 ➣ OK

-Repeat this step for subject marks and save-


Mark And Grade Worksheet

❖ Build Grade using VLOOKUP:

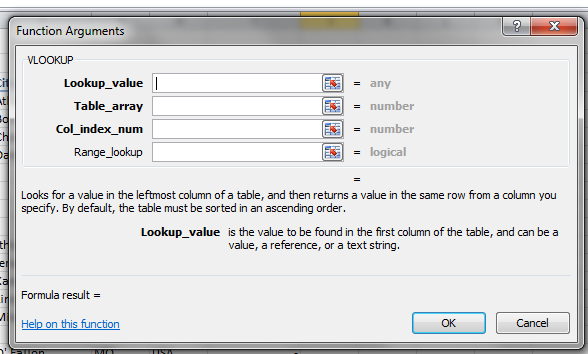
Build Grade sheet ➽ Build Scale Grade from small value to large ➽ Click on Mark sheet ➽ Click on D2 box for Bahasa Melayu subject ➽  On Menu Bar, click Formula ➽ Click Fx insert Function and on select category choose Lookup & Reference ➽ On select a function box, choose VLOOKUP ➽ OK


  • Lookup_value ➟ Click on C2 which is the mark that will be graded
  • Table_array ➟ select 'Grade' sheet and highlight on B5 : C15 cell. Insert '$' sign as B$5: C$15
  • Col_index_num ➟ type 2 which refer to space or value that will replace to the column for example 'A'
  • Range_lookup ➟ TRUE ( TRUE ↝ same pair and almost same, FALSE ↝ same pair only)

❖ Using COUNTIF

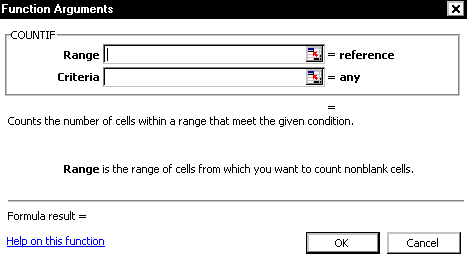
Copy grade scale and paste on cell box ❥ Click on D33 ❥ On Menu Bar, click Formulas ❥ Click Fx Insert Function, on select a category choose Statistical ❥ On select a function, Choose COUNTIF ❥ OK


    • Range ▶ select D2 until D31 which is the grade that already build. Add '$' as D$2:D$31
    • Criteria ▶ type 'TH' which refers to grade scale needed
    • OK
-Repeat the same step for next grade scale-


❖ Using SUM ⅀

Click on D44 ➼ On Menu Bar, click Formulas ➼ 𝞢Auto Sum ➼ highlight cell D33 : D43 ➼ ENTER

-Repeat the same step for other subjects-


Performance Chart Worksheet

⟡ Build Graph / Chart

⟡ Change title Series on the graph / chart

⟡ Chang type of graph / chart

⟡ Insert title on horizontal and vertical axis

⟡ Insert Label Data


MICROSOFT WORD


MICROSOFT WORD

Microsoft Word 2010 is a part of Microsoft Office 2010 family such as Microsoft Excel, Microsoft PowerPoint, Microsoft Access, Microsoft Outlook and Microsoft FrontPage.


Main function of microsoft word:

1. Document Formating
  • Size and type of font
  • Italic, bold and underline
  • Margins and page
  • Headers, footers and footnotes
  • Table, row and column
2. Document Editing
  • Insert
  • Delete and undo
  • Search
  • Replace
  • Move
  • Copy , paste and cut
  • Spelling checker
  • Grammar checker
  • thesaurus
3. Print Document
4. Saving Document


🔹Tutorial on composing a letter


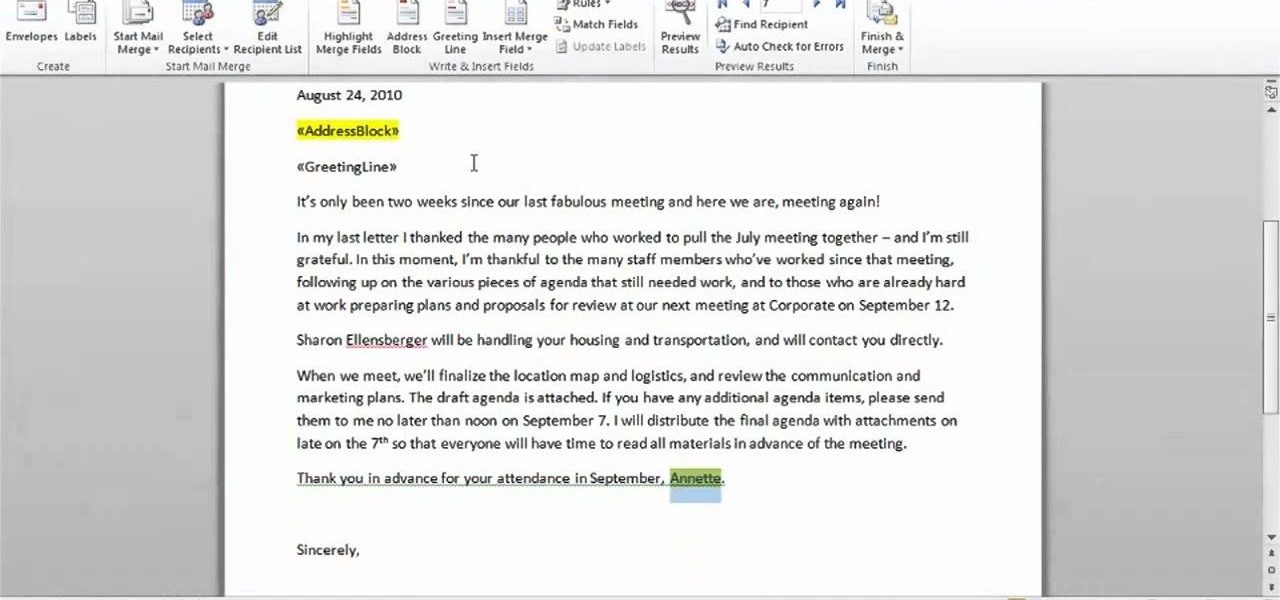
🔹Tutorial on composing a letter by using Mail Merge

-1- Build main document
-2- Build receiver list:
  • Select document type → Select Letters → click Next: Starting document
  • Click on Use the current document since we use the current letter → Next: Select recipients
  • Select Type a new list → Create → Dialog box of New Address List will be displayed
  • To insert data: Select Customize Columns → select Field Names that does not needed → Select > Delete → OK
  • Insert data of names and address of receiver. Click New Entry  to record next data

  • The data can be edited after save such as re-position the data, insert new record and delete record
  • Set the correct position of cursor of the address → {{AddressBlock}} will appear


  • Click Next: Preview your letters 
  • Click Next: Complete the merge after done the process
  • To print the letter, click Print
  • If want to make some changes on certain letter, click on Edit individual letters 
  • Mail merge completed.


CHAPTER 9 - OPERATING SYSTEM


CHAPTER 9 - OPERATING SYSTEM

Operating system (OS) ➠ a set of programs containing instructions that work together to coordinate all the activities among computer and mobile device hardware
  • Start and shut down a computer or mobile device
  • Provide a user interface
  • Manage programs
  • Manage memory
  • Coordinate tasks
  • Configure devices (insert drive/ mouse)
  • Establish an Internet connection
  • Monitor performance
  • Provide file management and other device or media-related tasks
  • Updating operating system software
  • Control a network
  • Administer security

Operating System Function
↬Starting computers and mobile devices
↬User interface -> controls how to enter data and instructions and how information is displayed on the screen
↬Graphical user interface (GUI) -> helps to interact with menus and visual images


↬The operating system:
⭕determines the order in which tasks are processed
⭕provide a establish Internet connections
⭕provide users with a variety of tools related to managing a computer, its devices, or its programs
  • File Manager
  • Search
  • Image Viewer
  • Uninstaller
  • Disk Cleanup
  • Disk Defragmenter
  • Screen Saver
  • File Compression
  • PC Maintenance
  • Backup and Restore
↬Automatic Update


Desktop Operating System
➭complete operating system that works on desktops, laptops, and some tablets


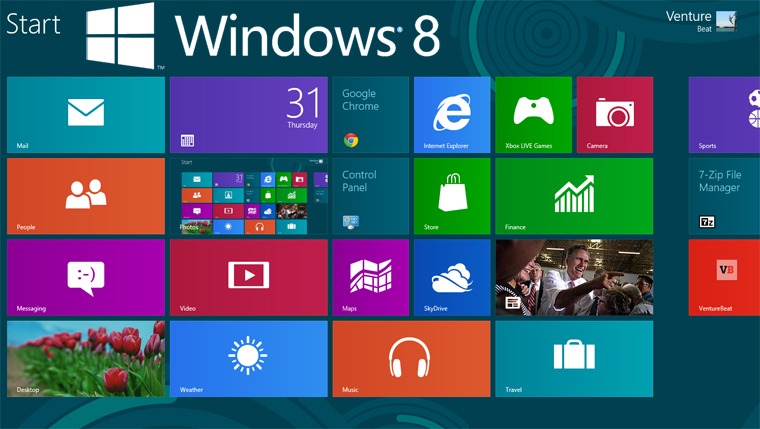
Windows 8 offers these features:
🔹Start screen interface with tiles


🔹Includes the desktop interface
🔹Support for input via touch, mouse, and keyboard
🔹Email app, calendar app, and browser included
🔹Enhanced security through an antivirus program, firewall, and automatic updates
🔹Windows Store offers additional applications for purchase


Server Operating System


Mobile Operating System
🔸The operating system on mobile devices and many consumer electronics


CHAPTER 8 - DIGITAL STORAGE


CHAPTER 8 - DIGITAL STORAGE

❖Storage❖
↷ Storage medium is the physical material on which a computer keeps data, information, programs, and applications

⛅ Cloud storage is another storage option, in which the actual online storage media used is transparent to the user

Types of storage:


❐ Capacity is the number of bytes a storage medium can hold


❐ Items on a storage medium remain intact even when you turn off a computer or mobile device


🖪Hard disk🖪
Hard disk contains one or more inflexible, circular platters that use magnetic particles to store data, instructions, and information


❥ A head crash occurs when a read/write head touches the surface of a platter (Hard disk cannot read)


❥ An external hard disk is a separate freestanding storage device that connects with a cable to a USB port or other port on a computer or mobile device


❖Flash Memory Storage❖
Flash memory chips are a type of solid state media and contain no moving parts

Differences between SSD and HDD
SSD
HDD
High price(1TB≈RM1000)
Low price(1TB≈RM160-200)
Smaller capacity (max1TB lp/4TB pc)
Big capacity (max4TB lp/10TB pc)
Short lifespan
Long lifespan
Low power consumption (2W)
Higher power consumption (7W)
High speed (200-550Mb/s)
Lower speed (50-120Mb/s)
  • A memory card is a removable flash memory device that you insert and remove from a slot in a computer, mobile device, or card reader/writer
  • USB flash drives plug into a USB port on a computer or mobile device

⛅Cloud Storage⛅
Cloud storage is an Internet service that provides storage to computer or mobile device users


💿Optical Discs💿


➺ Optical discs commonly store items in a single track that spirals from the center of the disc to the edge of the disc
➺ Track is divided into evenly sized sectors


❖Other Types of Storage❖

1) Magnetic Stripe Card
Contains a magnetic stripe that stores information

2) Smart Card
Stores data on an integrated circuit embedded in the card

3) Radio Frequency Identification (RFID)
  • RFID tag consists of an antenna and a memory chip that contains the information to be transmitted via radio waves
  • RFID reader reads the radio signal and transfers the information to a computer or computing device

  • Types of RFID tags:

4) Microfilm and Microfiche
Store microscopic images of documents on a roll or sheet film


Shy Female Monkey Flower Hairpin